VirtualBox for your first FAI installation
In the FAI guide one can find detailed instructions on how to use KVM, however it is quite possible to use any virtual machine, as in hypervisor, solution such as VirtualBox or VMWare.
The biggest obstacle is setting up the network between the host and various client machines correctly. There are two different setups.
- Bridged network: All VMs and the host machine share the same network via a bridged network. The DHCP server does not need to be under your control.
- Private network: A new private network for all VM running FAI will be created.
FAI install server in a bridged network
The FAI server will be installed from CD or USB stick by selecting the menu entry FAI server installation - using external DHCP. It will get an IP address from the DHCP server.

For this setup to work, you obviously require a DHCP server already
running in the network. In most home networks, that would usually be the router.
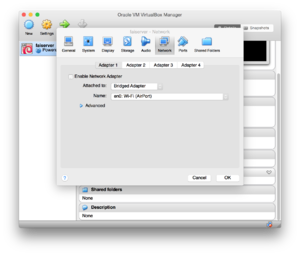
Simply create your virtual machine as usual, but instead of using a NAT for networking, select bridged adapter.
For the clients, use the same network settings as for the FAI server.
FAI install server in a private network with fixed IP
In this setup, the FAI server will also be the DHCP server and the server and the install clients run in a separate private network different from the host's network. The IP of the install server will be 192.168.33.250.
If you do not need some tap devices and the network bridge, you can
skip the fai-mk-network call and just enable IP forwarding and set up
NAT between the private network and the outside network by doing this:
# iptables -t nat -I POSTROUTING -o eth0 -j MASQUERADE
# sysctl -w net.ipv4.ip_forward=0
Then continue with creating the host-only network inside your VM software.
KVM
If you use KVM and the fai-kvm tool, you first need to create a software bridge in a private network on your host machine. The tap devices will belong to user username.
# fai-mk-network username
The script fai-mk-network will create nine tap devices and a bridge which has the IP 192.168.33.1. The script will also enable forwarding and NAT.
myhost[~]# ip ad
2: eth0: <BROADCAST,MULTICAST,UP,LOWER_UP> mtu 8995 qdisc pfifo_fast state UP group default qlen 1000
    link/ether 12:23:34:45:53:33:a2 brd ff:ff:ff:ff:ff:ff
    inet 111.222.33.44/25 brd 111.222.33.255 scope global eth0
       valid_lft forever preferred_lft forever
3: tap1: <NO-CARRIER,BROADCAST,MULTICAST,UP> mtu 1500 qdisc pfifo_fast master br0 state DOWN group default qlen 500
    link/ether f6:51:60:4f:2c:eb brd ff:ff:ff:ff:ff:ff
4: tap2: <NO-CARRIER,BROADCAST,MULTICAST,UP> mtu 1500 qdisc pfifo_fast master br0 state DOWN group default qlen 500
    link/ether f2:f3:1b:03:43:e0 brd ff:ff:ff:ff:ff:ff
.
.
.
11: tap9: <NO-CARRIER,BROADCAST,MULTICAST,UP> mtu 1500 qdisc pfifo_fast master br0 state DOWN group default qlen 500
    link/ether fe:35:50:53:79:84 brd ff:ff:ff:ff:ff:ff
12: br0: <NO-CARRIER,BROADCAST,MULTICAST,UP> mtu 1500 qdisc noqueue state DOWN group default
    link/ether f2:26:4f:10:27:fb brd ff:ff:ff:ff:ff:ff
    inet 192.168.33.1/24 brd 192.168.33.255 scope global br0
       valid_lft forever preferred_lft forever
myhost[~]# brctl show
bridge name     bridge id               STP enabled     interfaces
br0             8000.f2264f1027fb       no              tap1
                                                        tap2
                                                        tap3
                                                        tap4
                                                        tap5
                                                        tap6
                                                        tap7
                                                        tap8
                                                        tap9
On the host you see the network of the host system (here
111.222.33....) and our new private network 192.168.33.0/24.
myhost[~]# ip route
default via 111.222.33.254 dev eth0
111.222.33.128/25 dev eth0  proto kernel  scope link  src 111.222.33.136
192.168.33.0/24 dev br0  proto kernel  scope link  src 192.168.33.1
Virtualbox
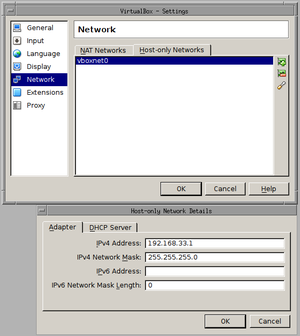
You have to enable IP forwarding and NAT on the host machine. Create a Host-only network in VirtualBox. This will be done in the main menu, not in the settings of a VM.
File -> Preferences -> Network -> Host-only Networks
Add a new network, this will become vboxnet0. Edit the preferences of this new network. Set the IP address to 192.168.33.1 or any other address which will not be used. Remember .250 will be used by the install server. It's very important to disable the DHCP server in this network!

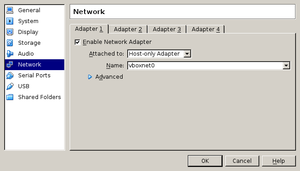
Then, for each VM choose the host-only Adapter vboxnet0 in the settings of each VM.

Now you can boot the FAI CD and install you FAI server using the menu
FAI server installation - using fixed IP. Your VM install clients can
be booted from the network card using iPXE.